Using Apple Mail
Using your NABET Local 53 Email with Apple Mail
PREFACE
Apple Mail is a program that comes standard with all Macs. It was designed to allow users to connect with .Mac, Apple's messaging system. Although it can be used with other mail systems, including the system used by NABET Local 53, many of the default and auto-fill configuration items geared for .Mac must be manually tweaked for proper operation. The same is true when Apple Mail is used with Gmail, Yahoo, etc. If you are having problems connecting, refer to the troubelshooting section of this tutorial (see below).
The instructions provided below are virtually identical when used with Tiger (OSX 10.4.x) or Panther (OSX 10.5.x)
FOR IMAP ACCOUNTS
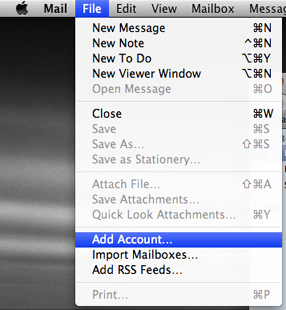
1.) Launch Apple Mail. From the {File} menu, select {Add Account}
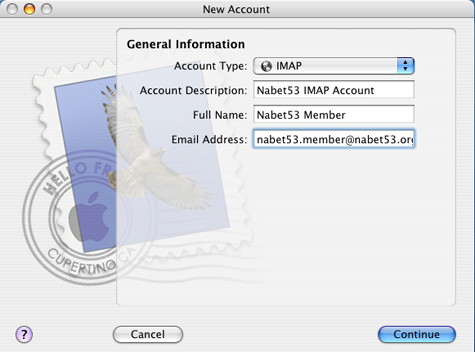
2.) From the drop-down menu under {Account Type}, select {IMAP}. Apple Mail will try and auto fill user information based upon .Mac expectations. Do not accept these parameters. Instead, fill in the user information as shown substituting your own personal information, then click {Continue}. Email addresses and account login names are based upon This email address is being protected from spambots. You need JavaScript enabled to view it.. For example, mail for member Jane Smith will be This email address is being protected from spambots. You need JavaScript enabled to view it..
Trouble logging in? Account names have been created from the information NABET Local 53 has on file. Let's say the name you go by is 'Larry Smith', but the information on file is Lawrence Smith. In this example, your email address and username would be This email address is being protected from spambots. You need JavaScript enabled to view it.. The same would be true for spouses with hyphenated married names. As an example, Mary Smith-Jones would have an email address and user name of This email address is being protected from spambots. You need JavaScript enabled to view it..
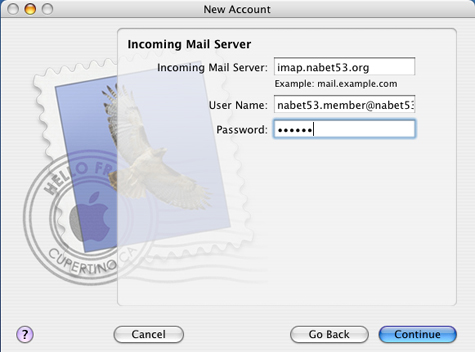
3.) Apple Mail will try and auto fill user information based upon .Mac expectations. Do not accept these parameters. Instead, complete the incoming mail server information as shown below. Remember, to use your complete username (same as your email address, e.g. This email address is being protected from spambots. You need JavaScript enabled to view it.) then click {Continue}
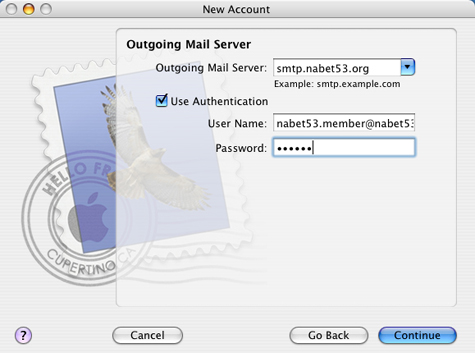
4.) Apple Mail will try and auto fill user information based upon .Mac expectations. Do not accept these parameters. Instead, complete the outgoing mail server information as shown below. Check the {Use Authentication} checkbox as shown. Remember, to use your complete username (same as your email address, e.g. This email address is being protected from spambots. You need JavaScript enabled to view it.) then click {Continue}
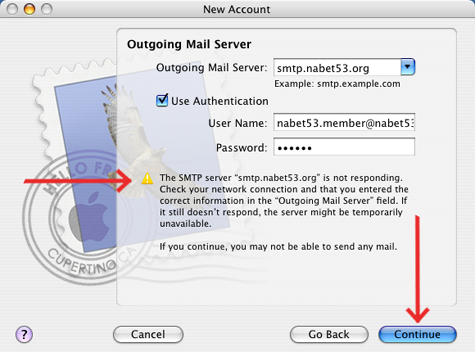
5.) You may see a screen like the one below showing the SMTP server is not responding. This is normal. Apple Mail is trying to communicate with NABET Local 53 ".Mac-style". Click {continue} and follow the instructions on the next screen (below)
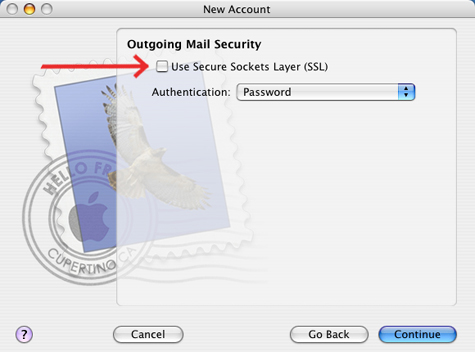
6.) Uncheck the checkbox {Use Secure Sockets Layer (SSL)}. Then press {Continue}
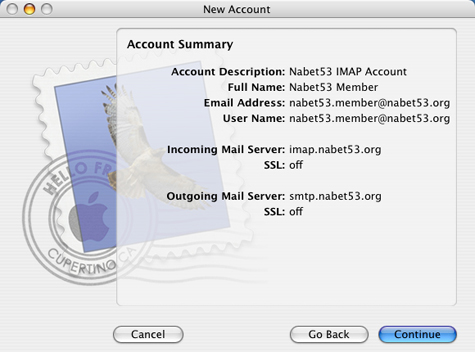
7.) Verify your information is correct, then click {Continue}
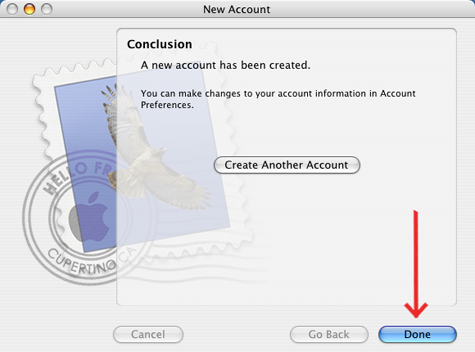
8.) As a final step, Click {Done}
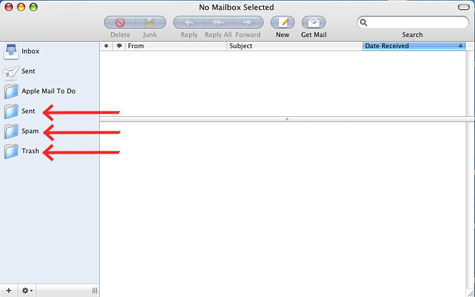
9) If all has gone well, you should see a screen like the one below. If Apple Mail is communicating properly with the NABET Local 53 server, the IMAP folders Sent, Spam and Trash will auto populate.
Congratulations! You are now ready to begin using your NABET Local 53 email account. (If you are unable to connect, proceed ahead to the Troubleshooting section)
TROUBLESHOOTING
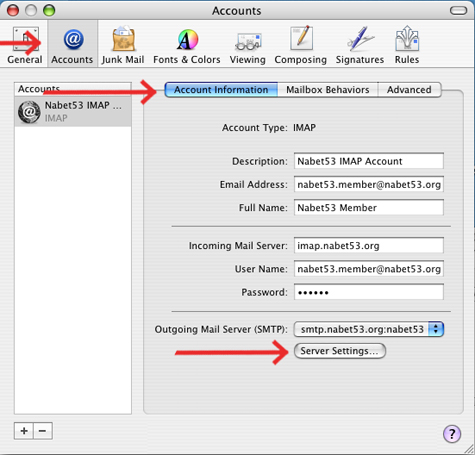
From the {Mail} menu, select {Preferences}

Select the {Accounts} sub-menu. On the {Account Information} tab, be sure all your account information is correct. Remember your username is exactly the same as your email address.
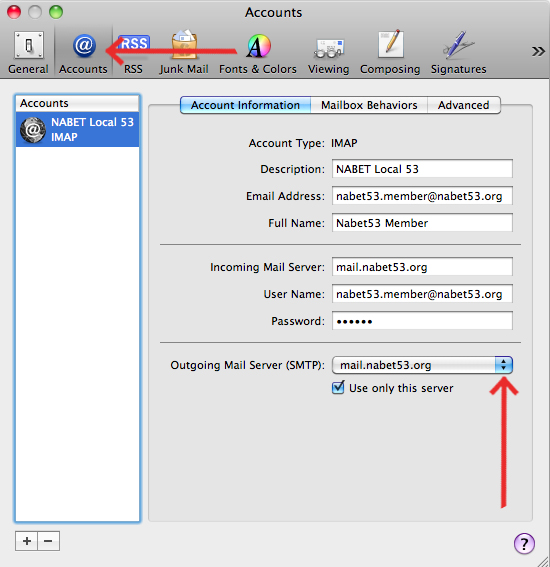
On Older versions of OSX (i.e. Tiger), Click the {Server Settings} button.
On newer versions of OSX (i.e. Leopard or greater), click the {Outgoing Mail Server} dropdown box
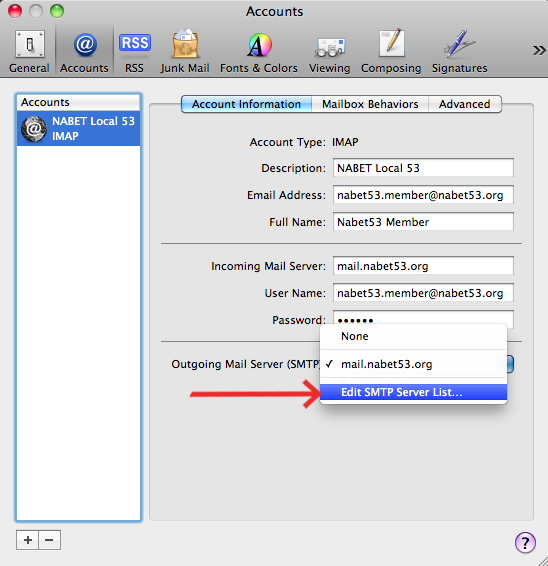
Then select {Edit SMTP Server List} from the Dropdown Menu
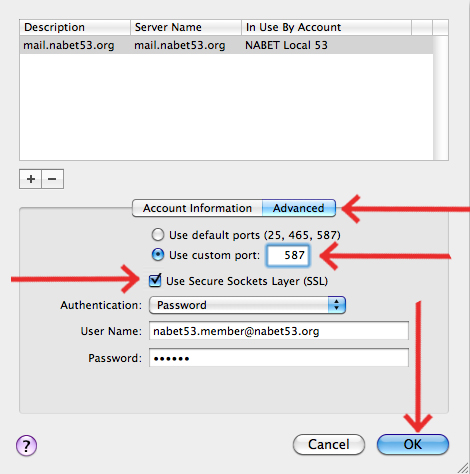
Click the {Advanced} tab. Be sure the correct outgoing server name is listed. The server port must be set for 587. Insure the {Use Secure Sockets Layer (SSL) checkbox is checked. Click {OK}
On the {Advanced} tab, insure the port listed is 993 and the {Use SSL} checkbox is checked. Finally, be certain the {IMAP Path Prefix} is "INBOX" (as shown, without the quotes and in ALL CAPS)

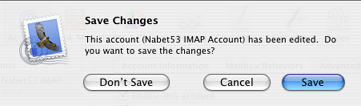
When you have completed making changes, close the {Preferences} box and click {Save} to save your changes.
If you have followed all of the above steps in the tutorial and troubleshooting sections, you should now be communicating with the mail server using Apple Mail. Your screen should now look like the one as in Step 9 (above)

Latest Events
| NBC Shop Steward Meeting Thu, May 02, 6:00pm - 8:00pm |
| FOX/KTTV/DISNEY FX Shop Stewards Meeting Tue, May 07, 6:00pm - 8:00pm |
| Executive Board Meeting Thu, May 09, 11:00am - 1:00pm |
Featured Links